 Save
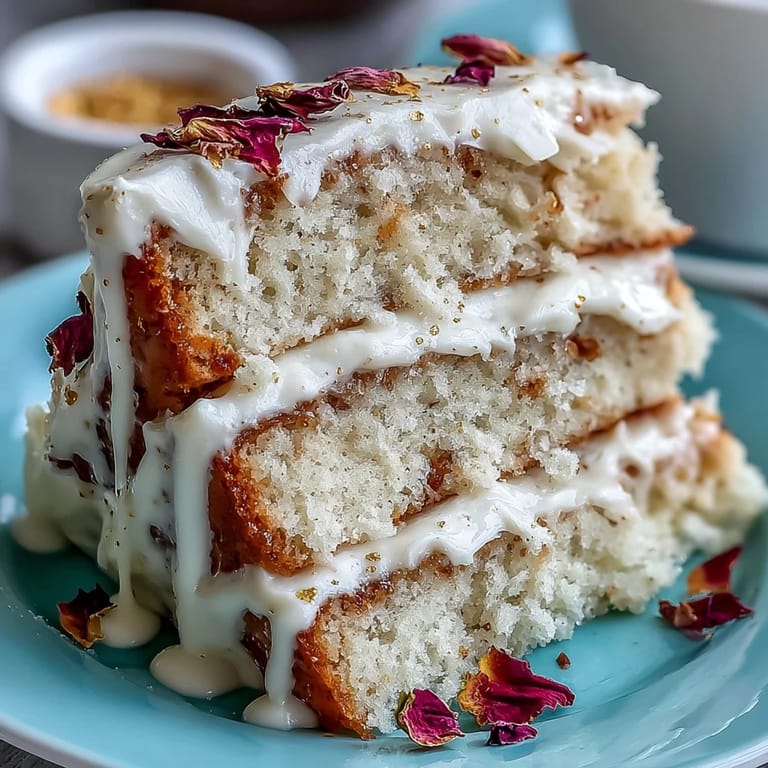
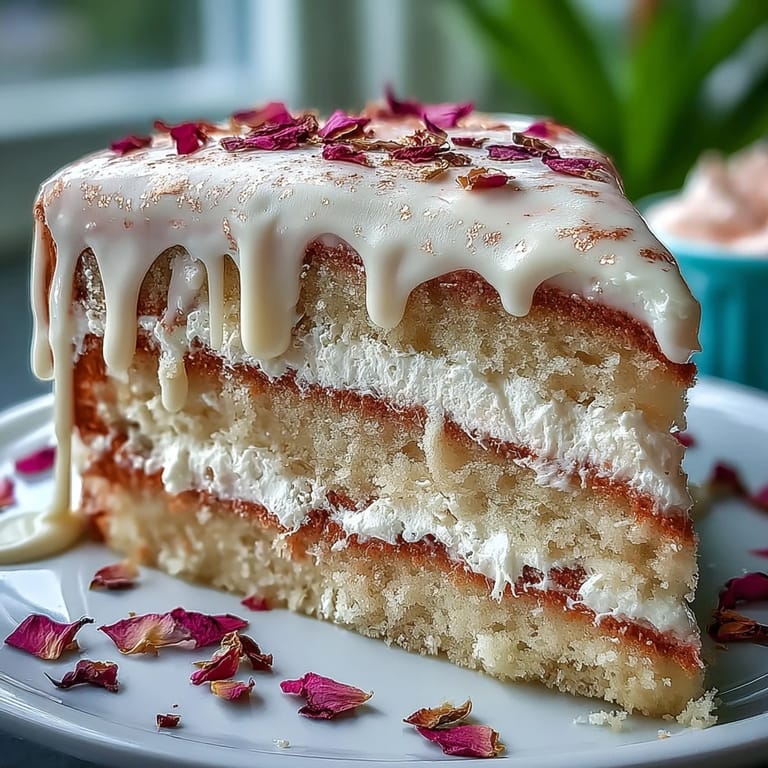
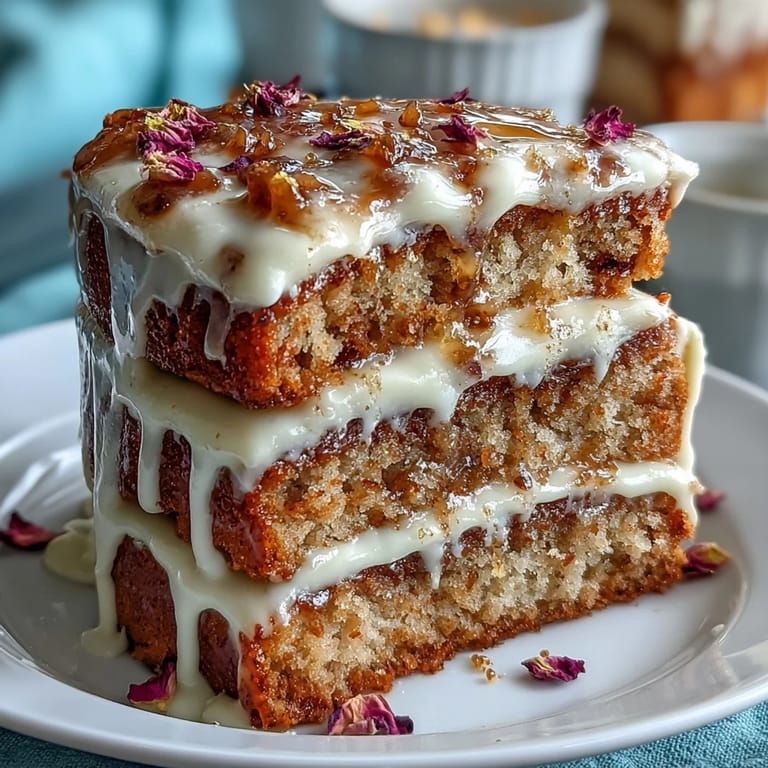
Save Pink clouds mingled with laughter in my tiny kitchen the afternoon I first whipped up this Rosé Velvet Cake. The fragrant curl of rosé as I poured it into the batter caught me off guard—not intoxicating, just cheerily floral, the kind of scent that belongs to open windows and fizzing celebrations. At that moment, I understood how much fun a cake could be, and how unapologetically glamorous. Turning silky pink layers out of their pans while my playlist bounced in the background, I felt a low-key thrill at the transformation. That gold drip? It was pure whimsy: a little wild, a little decadent, and absolutely perfect for a room bursting with good wishes.
I still remember icing this cake for my cousin's bridal shower, stealing a few stray spoonfuls of frosting as we debated her playlist. We were pressed for time, and yet, in those frosting-swirled minutes, I swear every worry faded into vanilla and giggles. The chatter almost covered my slip when I overdid the gold paint on the first drip—but everyone loved the extra shimmer anyway.
Ingredients
- Cake flour: Gives the cake an airy, tender crumb; sift it well for the lightest layers.
- Granulated sugar: Sweetens and keeps the crumb soft; measuring by weight helps avoid dryness.
- Baking powder & baking soda: Both are needed for just the right lift; check freshness for best results.
- Salt: A pinch sharpens every flavor, especially with sweet rosé.
- Unsalted butter: Softened, it makes the cake rich and smooth; I beat it an extra minute for extra fluff.
- Vegetable oil: Adds moistness and helps the cake stay soft for days.
- Eggs: Room temperature is key so they blend seamlessly; crack them into a bowl first to avoid shell surprises.
- Rosé wine (not sparkling): The heart of the cake—pick one you'd drink, since its delicate flavor shines through.
- Vanilla extract: Boosts the wine's floral notes and soft roundness.
- White vinegar: Reacts with leaveners for a true velvet crumb; don't skip this tiny secret.
- Pink gel food coloring (optional): Concentrated color means a little dab will do for that blushing hue.
- Cream cheese: Must be fully softened for ultra-smooth frosting; leave it out while the cake cools.
- Unsalted butter (again): For the frosting; soft and dreamy for easy spreading.
- Powdered sugar: I always sift it for a lump-free, cloud-like frosting.
- Heavy cream: Makes the white chocolate drip ultra-glossy; room temperature blends best.
- White chocolate: Chop it fine so it melts evenly for the drip.
- Edible gold luster dust: Use a small, clean brush and go slow to avoid smudging everywhere.
- Vodka or lemon extract: Helps turn luster dust into a paintable gold; vodka evaporates cleanly.
Tired of Takeout? 🥡
Get 10 meals you can make faster than delivery arrives. Seriously.
One email. No spam. Unsubscribe anytime.
Instructions
- Prep the Pans and Oven:
- Heat your oven to 350°F and line three cake pans with parchment so nothing sticks later.
- Mix Dry Ingredients:
- Whisk cake flour, baking powder, baking soda, and salt together so they're evenly blended and airy.
- Cream Butter, Oil & Sugar:
- Beat them together until the mix looks light and glossy—pause to scrape down your mixer bowl if needed.
- Incorporate Eggs and Flavorings:
- Add eggs one at a time, combining fully after each, then mix in vanilla and vinegar so every bite gets a hint.
- Combine with Rosé:
- Alternate adding flour mix and rosé, beginning and ending with flour; the batter turns prettily pink at this point.
- Bake the Cakes:
- Divide batter among pans, giving each a gentle tap before sliding them into the oven for 30-35 minutes, until a tester comes out clean.
- Cool and Release:
- Let cakes sit in their pans 10 minutes, then flip out onto wire racks to cool so the centers stay soft.
- Make the Frosting:
- Beat cream cheese and butter until silky, then slowly add powdered sugar; chill if soft on a warm day.
- Assemble the Layers:
- Level cakes if needed, layer with frosting in between, and smooth all around with an offset spatula.
- Gold Drip Magic:
- Gently warm cream and pour over chopped white chocolate; stir until melted, cool, then drip over cake edges for drama.
- Paint It Gold:
- Mix luster dust with vodka until it looks like molten gold, then brush drips with care for a bridal glow.
 Save
Save After the bridal shower, we stood around the kitchen island, nibbling leftover crumbs and marveling at how the cake caught the late afternoon sun. It was more than a dessert—it was the glittering centerpiece for a day none of us wanted to end.
Choosing the Right Rosé
Not all rosé wines are equal for baking—I stick to one that's fresh, light, and not too sweet. The subtle tartness works magic with the vanilla and cream cheese, leaving the cake tasting grown-up rather than candy-like.
Decorating Without Stress
If the fancy gold drip seems intimidating, remember: imperfection is half the charm. Those drips that don't match are conversation starters, and a dusting of a little extra shimmer hides any smudges instantly.
Make-Ahead and Storage Real Talk
I've learned to bake the cake layers a day ahead and wrap them tightly once cool, so assembly on the big day is a breeze. The finished cake keeps beautifully in the fridge for up to three days, and a quick rest on the counter brings the flavors to life again.
- Wrap the cooled layers in plastic wrap before chilling.
- Frosting firms up in the fridge, so let it soften before serving.
- Use a hot knife for the neatest cake slices at the party.
 Save
Save This Rosé Velvet Cake is my go-to for big toasts and tiny triumphs alike, guaranteed to bring sparkle to any gathering. Give it a try, and watch your kitchen fill with pure celebration.
Recipe FAQs
- → Can I omit the alcohol while keeping the rosé flavor?
Yes — substitute equal parts pink grape juice with a splash of lemon juice to mimic rosé brightness. Adjust sweetness as needed to maintain balance in the batter.
- → How do I prevent the layers from sliding when stacked?
Chill each layer until firm and use a chilled, slightly stiffer cream cheese frosting for the crumb coat and final coat. A thin layer of frosting between layers acts as adhesive to hold them steady.
- → What's the best way to get an even pink hue?
Use gel food coloring for concentrated color without thinning the batter. Add a little at a time until you reach the desired shade; remember that baked color may soften slightly.
- → How should I prepare the gold drip to ensure it adheres?
Make a smooth white chocolate ganache for the drip and cool it until just pourable. Apply to a well-chilled cake so the drip sets quickly, then mix edible gold luster dust with vodka or lemon extract to paint over the set drips.
- → Can components be made ahead?
Yes — bake layers up to 2 days ahead and wrap tightly in plastic. Frosting can be refrigerated; bring both to room temperature before assembling. Alternatively, freeze layers and thaw slowly in the refrigerator overnight.
- → How should I store leftovers to retain texture?
Keep the cake refrigerated in a covered container to protect the gold finish. Bring slices to room temperature for 30–60 minutes before serving to soften the frosting and enhance flavors.